China Glaze
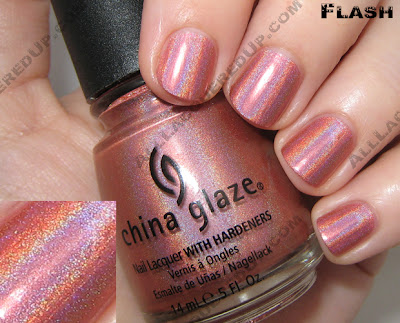
China Glaze Spring 2008 – OMG! 2BHOT
And now for you warm toned gals, the China Glaze OMG! 2BHOT Collection. I keep trying to convince myself that I’m neutral because I love warm and cool colors equally but I think it’s clear that the 2BKEWL colors work better on me. What do you all think?
Since the formulas are the same for both sets in this collection, you can check out the 2BKEWL for my review.
The 2BHOT set includes:

 Comparison images are in the works. I just have to find my bottle of OPI Day At The Peach.
In the meantime, which set is your favorite? Will you cave on just one or both?
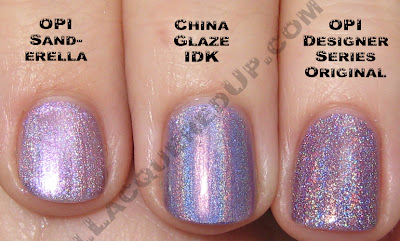
China Glaze OMG 2BKEWL Comparisons
I don’t own every holographic polish out there but I did sift through the ones I have to give you some 2BKEWL comparisons. I hope these are helpful in your purchase decisions.
China Glaze Spring 2008 – OMG! 2BKEWL
It’s rare that a nail polish collection comes out with so much pre-sale buzz as this OMG! Collection from China Glaze. Now I don’t know if it was part of their marketing scheme but a few lucky MUA members were able to find these beauties prior to release and it certainly drummed up a lot of excitement.
Just as I’m not a sheer girl, I know not everyone is a holo lover. It’s a lot of sparkle and shimmer to pull off and not necessarily appropriate for all occasions. Not that it stops me from wearing them. I can’t help but be mesmerized by my rainbow nails when ever the light hits them. So when I laid my eyes on these colors, I swooned a bit.
The OMG! collection lacquers are all very pigmented and opaque with two coats. They dry to a smooth matte finish so you really need a top coat to make them glossy. Though considering how many people are looking for a matte top coat, you might like these on their own. The images below are without a top coat and to be honest, they are a good but not great color representation. The shades are a bit bolder in person but I think the finish prevented me from capturing that.
Normally I would do individual reviews but I feel the pics speak for themselves. The formula and application is consistent through all the colors; a bit on the thick side but still even. I did end up with a bit of cuticle dragging from OMG but that issue could have been due to rushing between coats.


The OMG! collection has just started shipping out so look for them at your favorite China Glaze retailer. Stay tuned for 2BHOT Collection swatches tomorrow.
China Glaze Spring 2008 Preview
After a reading about how few lucky MUA nail boarders stumbled across some never before seen China Glaze polishes at a local beauty supply, the board went into a frenzy. With holographic polishes given techno savvy names like DV8, IDK, QT and LOL and brights named Flying Dragon, Sacred Heart and Blue Sparrow how could they not. Of course, I had to investigate further.
Hide your wallets now ladies because China Glaze is hitting us with three, THREE, new color collections this spring. Something for the chat-addicted sparkle fanatics, the eco-conscious lacquer lover and the bold artists in all of us.
OMG! – Fingers are the focus when flying across the keypad. For today’s texters, having beautifully manicured digits is so important. New OMG!– 12 micro particle holographic lacquers–gives the stylish and tech-savvy women of today something to get their hands on. Two palettes—one hot, one cool– plus Wireless Holographic Top Coat. Text in colour.
 ECOllection – In Blahniks or Birkenstocks, going green is always fashionable. Reminding everyone to tread lightly, ECOllection shades represent sun, clouds, trees, water, sand and earth. Printed on recycled paper. Conserve in colour.
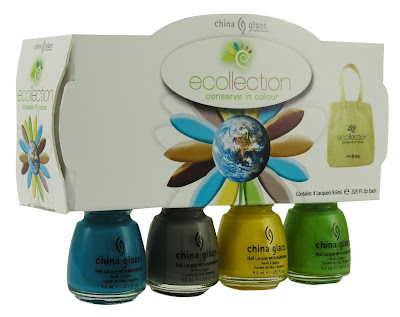 INK – Tattoo art has moved out of back alley parlors onto the couture collections of fashion’s top designers. INK is a collection of neons for brilliant self expression. China Glaze wants every woman to get inked. Comes with nail art decals.
 I don’t have an official release date but I’ll update you when I do.
Images & Info: Courtesy of China Glaze
Customization: Frankenpolish & The Art Of Layering
 Ask any beauty junkie and we’ll admit, no matter how many shades, fragrances or formulations are thrown our way we are still restless for more. Even if we find that perfect product, after a while we’ll wish it was a bit more “something”. Deeper in color, smoother in feel, slightly more floral, etc. Let’s face, it we’re just never satisfied.
As we’ve learned from magazines, makeup artists and our fellow product junkies, beauty is like Burger King; we can have it our way. All it takes is a little customizing. Whether it’s layering your favorite perfumes to create a signature scent, mixing your moisturizer in with your foundation to make it sheer and dewy or blending eight different shadows to achieve that perfect smokey eye we love to alter and combine our favorite products.
In the world of lacquer it’s no different. When we can’t find the color we want we become kids again, mixing lacquer like we used to mix our finger paints. It’s all about experimenting, letting your imagination go and relying on our childhood art lessons about the color wheel. Say it with me folks, yellow and blue make green. Now I’m having Ziploc commercial flashbacks.
There are two methods of customizing polish:
- Layering – Using multiple layers of different colors to create the desired shade
- Mixing – Combining two or more lacquers in a bottle (aka Frankenpolish)
First let’s discuss the easiest way to customize your color, layering. It’s very no muss, no fuss. The only real trick is making sure the edges of each layer line up. If you have a shade that is too light or dark, layer it over white or black. Is your polish to sheer? Layer it over a similar hued opaque formula or black. Everything looks more intense over black. Love the shade of your chrome or metallic finish polish but hate the brush strokes? Add a sheer on top to achieve a smoother finish. Here are some examples from my own experiments.
I was so excited when I got China Glaze Kaleidoscope Him Out and He’s Going In Circles because not only are they holographic but they’re blue and green holos. Unfortunately, I didn’t feel that the green and blue made enough of an impact.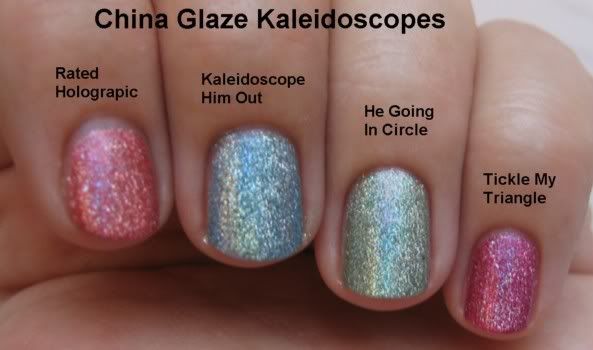
So I layered them over opaque creme lacquers and pow! Instant intensity.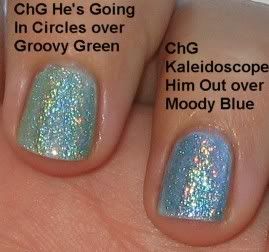
Here’s an example of how I combated brush strokes in a metallic finish. I love the color of China Glaze Open Sky but the finish left something to be desired. So I turned to a holo for help. Adding a layer of OPI Blue Moon Lagoon didn’t alter the beauty of Open Sky, it just added a little bling and a smoother look.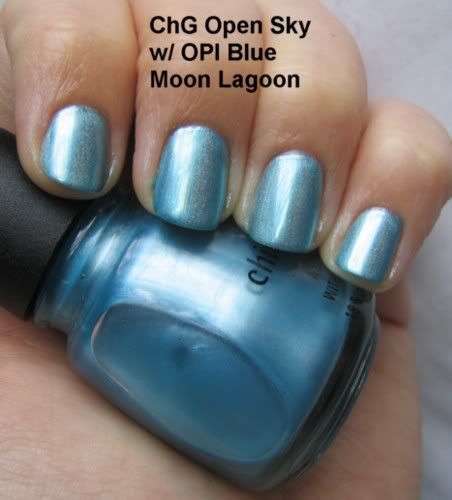
These two were just for fun. I love my greens but a girl can never have enough options.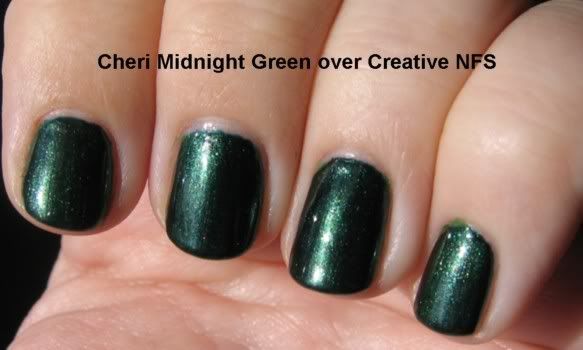
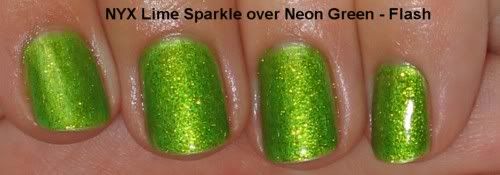
Now on to the science project that is the Frankenpolish.
My first try at making my own polish was to mix MAC pigment with clear lacquer. Mixing pigments can be a lot of work but if you have a gorgeous shade that would look great on your nails, it’s worth it. I buy Milani clear polish but others like using Sally Hansen Insta Dri. I add 1/4 tsp. of pigment at a time and mix, mix, mix before I test it on the nail. Just keep adding pigment until you’ve reached the desired opacity. If you can, add a couple mixing balls because the pigment will settle out when not in use.
Here are the results of my first ever pigment mix. This is MAC Entremauve in Milani Crystal Clear lacquer. The pink sparkles in Entremauve really pop as a polish.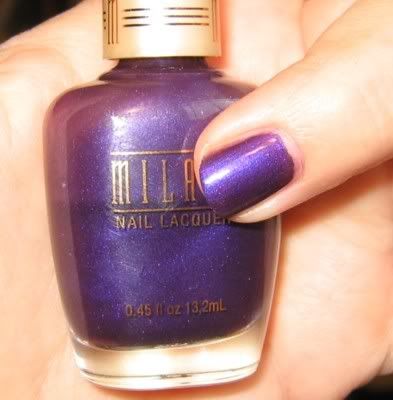
The other method for mixing your own polish is to combine different lacquers to create a new shade. The true Frankenpolish.
Disclaimer: Due to the volatile nature of nail lacquer ingredients I do not condone or promote mixing formulas from different manufacturers. There is no way to know if they will safely combine. So franken at your own risk.
For great tips on the supplies, process and recipes, check out the Frankenpolish Notepad on Makeup Alley. Bravo to Christine from 15 Minute Beauty Fanatic for creating it and to all the lovely MUA members that contribute to it.
These lovely frankens are the creation of MUA member jennyferr.
45% OPI Lincoln Park After Dark, 10% Black
Camouflage, 1/3 Zoya Tangy

Now it’s your turn. Share your favorite layering combos and recipes.
photos: All Lacquered Up and jennyferr on MUA


