CND
CND Colour, Effects and Henna?
 Happy Monday Fanatics! After another fun but tiring weekend away, this time with my Michigan/Cedar Point friends, I have some fun nail pics to show you.We drove up for German Park, a festival that takes place at the German Park Recreation Club the last weekend of June, July & August. It’s a lot of German food, beer and music in a very off the beaten path type location. We went and staked out a couple picnic tables for a day drunken stupidity, good food and card games. Thank goodness we had our preggers DD to cart our tipsy butts back. Happy Monday Fanatics! After another fun but tiring weekend away, this time with my Michigan/Cedar Point friends, I have some fun nail pics to show you.We drove up for German Park, a festival that takes place at the German Park Recreation Club the last weekend of June, July & August. It’s a lot of German food, beer and music in a very off the beaten path type location. We went and staked out a couple picnic tables for a day drunken stupidity, good food and card games. Thank goodness we had our preggers DD to cart our tipsy butts back.
While I was there I snuck out to meet up with one of my fave fellow bloggers, Christine from 15 Minute Beauty Fanatic, which meant an early morning mani was in order. I’ve been carrying around a couple of the new CND Colour & Effects polishes since becoming obsessed with a certain color combo so that’s what I went with. Check it out after the jump! |
As I mentioned in my Cosmoprof Recap, CND totally revamped their line with the introduction of Colour & Effects. They’re releasing 50 Colours in a range from the whitest white to the blackest black with primary, secondary and metallics thrown in to provide a well rounded palette of shades. In addition, the 15 Effects allow you to transform the Colours with sheer pearls, shimmers and glitters to layer over top. It’s similar in concept to the brand Nailtini only the polish quality is like 100 times better.
Let’s talk about the polish. The new CND formula is 3-free AND free of the dry time issue that plagued CND polishes in the past. I’ve tested it now using a few different top coats and those old denting problems are gone. They also have a new ergonomic bottle with a rubberized cap and a NEW BRUSH!!
The brush is flat but not too wide. It’s about a 1/3 the width of my pinkie nail which means I can fan it out without hitting skin but the actual bristles are what make it unique. They are very thin but triangular in shape. I’m not sure why that makes a difference but application is AH-MAZING!! Seriously you guys, I’m so in like with this polish I want to send it a note to ask if we can be BFFs.
So when we got the chance to play with the new Colours & Effects at the Cosmoprof launch, the combination I loved most was layering Sapphire Sparkle, a smooth, bright blue glittah, over Inkwell, a blue-black creme. There’s something about the glitter in this one that makes it look purple-ish depending on the light. I took way too many pictures but I’m sure you won’t complain over that.
I’ve never worn henna before so I was fascinated to hear her talk about how there are different types of henna paste and how you should avoid toxic “black henna.” How she mixes her own and scents it with lavender (it smelled so fab!).
As she started drawing the design on my hands, she did warn that copious amounts of German beer may effect the results. Considering that I have a hard time drawing a stick figure when playing Hangman, I think she did a pretty wicked job, no?
Here we are today, approximately 36 hours after she applied the design and I’m totally loving it. I’m told it can last anywhere up to nine days with proper care and moisturizing so unless you work in a relaxed environment, like I do, you may want to consider a less conspicuous placement should you delve into henna art. Since I’m way too much of a baby to ever get a tattoo, this is a perfect alternative.
 What do you all think? Are you liking my CND combo? Are you a fan of henna?
The CND Colour & Effects line will launch in the Fall at salons and spas in the US. Colours will retail for $9, Effects for $11.
Fanatics in the Ypsilanti/Ann Arbor area can contact Julie regarding henna body art at ArborHenna.com.
COSMOPROF Day 1 Recap
My first stop was the Discover Beauty section of CosmoProf. It’s an area with new, emerging brands looking for US distributorship. When I saw Nails Inc. listed on the show map, I made an immediate beeline to their booth. Fanatics, let’s hope, hope, hope that they get picked up by someone like Sephora or ULTA or some other online/chain store. We NEED Nails Inc. in our lifestyle like ASAP. The color line is amazing, the packaging is so so chic AND they have a 45 Second Top Coat that has me in utter disbelief. They were giving a sneak peek at their holiday blinged out polishes and I MUST have one in my collection come December. The perfect stocking stuffer, no? Within the Discover Beauty section, Total Beauty manned the Beauty Blogger Central booth. As a guest of Total Beauty I was invited to vote for the best of the Discover Beauty section. I voted for Nails Inc., natch. Granted there are a lot of unique new brands represented but Nails Inc. stole my polish loving heart.
 On display in the Blogger Central booth is Total Beauty’s Top 10 rated products of the brands exhibiting at the show. I’m DYING to try the magical Morroccan Oil I’ve heard so much about.

One booth that made me stop in my tracks was KleanColor. Their display of colorful Nail Lacquers drew me right in. And I was beyond flattered that the rep for the brand actually reads ALU. Now I just need to track down where I can order the polishes from. If anyone has a KleanColor hookup, give me a shout!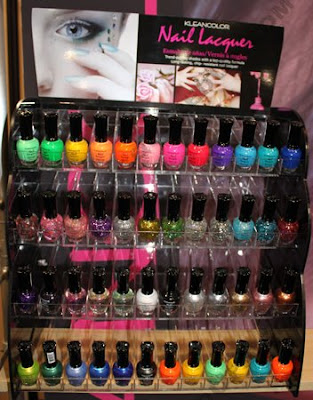 One look at these bottles and you’ll understand why I was drawn in to Np2′s booth. Talk about a unique shape! And the color range is uber-chic. There are some vampy greens, blues and purples that I can’t wait to get my hands on. According to the rep for the brand, the formula is will knock Essie & OPI out of the water. They’re hoping to launch in Sephora soon so keep your eyes peeled.
 As I wandered aimlessly trying to figure out the long winding ailes of booths, I came upon Essie, THE ESSIE! It’s like spotting a rock star. I also ran across Suzi of OPI, Jessica Vartoughian of Jessica and celebrity hairstylist Ken Paves, creator of HairDo. He’s so adorable and pocket sized!
 I had to stop by the Color Club/Art Club booth to check out Wild At Heart. That purple and teal green will be MINE!


Next up, the SpaRitual/Orly booth. There are some incredible colors coming down the pike from both brands including two luscious greens for Spring (can’t wait!). First let’s talk SpaRitual. They too are releasing a matte collection called Mind Body Spirit only they formulated a base coat to apply underneath and extend wear. The rep I spoke with was wearing the purple, Spirit and it’s totally gorg. There is also a Fall colllection that I’m bringing home with me to show you.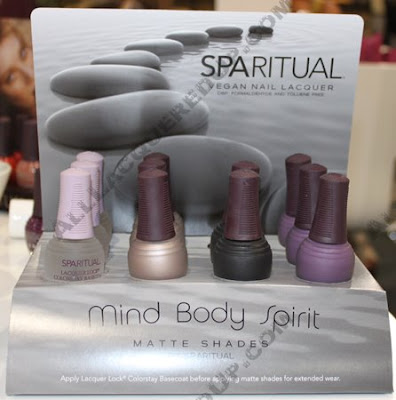
Out now for fall, the Orly Once Upon A Time collection comes with adorable fairy tale themed charms on the bottles. Enchanted Forest, Pixie Dust and Mirror Mirror are immediate faves. For holiday they will introduce Femme Fatale and collection of festive reds.
For Spring/Summer 2010 there is a candy colored collection with matching mini lipglosses, a colorful vivid floral inspired collection called Bloom that includes the green I mentioned.
Finally, the true highlight of my day was attending the CND Colour & Effects launch party. CND’s own Jan Arnold greeted us warmly, wearing yet another killer ensemble. That woman has such amazing style I can’t even stand it. She remembered meeting me backstage at the Barbie show during fashion week and it totally made my day.
I have so much more to show you and say about this amazing revamp of the CND line but I’ll just give you a quick rundown. Basically, CND has completely changed their game. Being that they are all about customization at fashion week, creating custom blends for designers all over the world, they have now brought that concept to all of us. The Colour consists of 50 perfect cremes in a range of shades that will satisfy any addict. There are true primary and secondary shades, sheers, neutrals, pinks, reds, vampies, etc.
The Effects are 15 opalescent pearls, shimmers and glitters that you can layer over the Colour shades to customize your color. They may look similar in the bottle but once you start to play, you really see the difference. Jan invited us to play at the colour bar and can you guess where I plopped myself down? In front of the “me” colors of course. I went to town swatching different Colours and testing them under the Effects. I was in heaven!
Being the kind, generous woman she is, Jan invited everyone to take home their favorite Colour & Effects combos but when she saw my bag with just a few bottles (I didn’t want to be greedy) she sent me back for more saying, “You’re All Lacquered Up, that’s not nearly enough!” Oh and I didn’t even get to the bottles. They redesigned the shape of the bottles to be more ergonomic with a soft rubberized cap. And the BRUSH, wow on the brush. It’s now flat but THIN flat, very pinky nail friendly, and the bristles are triangular and clear, a first in the industry. I actually did a little playing back in my room and they apply phenomenally! I can’t wait to show you.
Well that’s pretty much Day 1. We finished the night with a cocktail party at The Mix in The Hotel and dinner at Strip Steak in the Mandalay Bay. The food was so spectacular I regret not taking pics for the fellow foodies out there. Next time, I promise!
Also, I’m attending the show with Phyllis from Makeup For Life so be sure to visit her blog to see the products that she discovered.
Coming Soon – CND Colour Effects
Lookie what I found. The Nails Magazine Editor’s Blog featured a story on the upcoming launch from CND. I know I’ve been asking for too long now, when is the next collection coming out? When do we see some new colors? Come on CND!!
Well the wait will soon be over. CND is launching a new perm line called Colour Effects; 50 creme Colours and 15 Effects that you can layer over top to create your own custom shade. The CND team hinted that the next big launch would be totally different and all about customization and knowing their reputation for creating custom colors for Fashion Week, I had a feeling we’d see something along these lines.
It sounds like a large scale, more budget friendly (I hope) version of Nailtini. Though us fanatics have been layering and frankening for years so I’m curious how this line will be embraced and if the mainstream consumer will be into it.
I am curious to see the new bottles as they’ve revamped the design to be more ergonomic with a rubberized cap. FYI, I’ll be attending CosmoProf in Vegas in a few weeks so I’m hoping to see for myself and bring you a full report!
For now, check out the Nail’s Blog for pics from the special launch party.
The ALU Archives – CND Wildfire
 The ALU Archives focuses on older, beloved shades from the All Lacquered Up stash.
Mr. ALU is as much a fan of red as I am of green. Together we make the perfect holiday-themed team. In the 10 years we’ve been dating, he has owned two red Grand Ams, flocks towards red clothing every time I can actually get him to shop and continually compliments me anytime I don a red manicure. So this week’s Archives selection is all for him. It’s a shade that when I put it on, he not only noticed but said “Wow, I like that color.” As I’m sure you ladies know, that’s major in man-speak. The ALU Archives focuses on older, beloved shades from the All Lacquered Up stash.
Mr. ALU is as much a fan of red as I am of green. Together we make the perfect holiday-themed team. In the 10 years we’ve been dating, he has owned two red Grand Ams, flocks towards red clothing every time I can actually get him to shop and continually compliments me anytime I don a red manicure. So this week’s Archives selection is all for him. It’s a shade that when I put it on, he not only noticed but said “Wow, I like that color.” As I’m sure you ladies know, that’s major in man-speak.
So read on to check out my flaming red mani in CND Wildfire. |
What really impresses me is how CND has perfectly combined pigmentation and smoothness of formula. Wildfire is practically a one coat red yet its viscosity is so thin you’d think it a sheer. Every time I put on one of their polishes I hope for new colors to release because the formula is just that damn fabulous! The color itself is a cherry red with a hint a berry in its base. You can’t really see that as you apply it but as the lacquer floats down the bottle neck and thins out, it’s there. As I’ve mentioned in the past, the only complaint that comes with the CND formula is dry time. I’ve seen so many MUA nail board girls bitch about getting sheet marks and dents even after waiting up to an hour for the polish to dry. Drying tip: Use CND products with the polish. Product lines are formulated to work best with the accompanying products. Look at the Zoya Color Lock System for example. When I use Ridge Out base, Super Shiney top and SolarSpeedy Spray I can touch, even press my fingers on the polish, after only 20 minutes without leaving a mark. What do you think fanatics? Feeling the fiery red?
 Wildfire has been all over the runways the past two seasons at shows like Tibi, for spring, and on Retro Barbie for fall. A classic red like this transcends trends in its timelessness.
 CND Wildfire is available at salons and spas across the country and of course, our favorite e-tailers have it too.


