
Blue
Customization: Frankenpolish & The Art Of Layering
 Ask any beauty junkie and we’ll admit, no matter how many shades, fragrances or formulations are thrown our way we are still restless for more. Even if we find that perfect product, after a while we’ll wish it was a bit more “something”. Deeper in color, smoother in feel, slightly more floral, etc. Let’s face, it we’re just never satisfied.
As we’ve learned from magazines, makeup artists and our fellow product junkies, beauty is like Burger King; we can have it our way. All it takes is a little customizing. Whether it’s layering your favorite perfumes to create a signature scent, mixing your moisturizer in with your foundation to make it sheer and dewy or blending eight different shadows to achieve that perfect smokey eye we love to alter and combine our favorite products.
In the world of lacquer it’s no different. When we can’t find the color we want we become kids again, mixing lacquer like we used to mix our finger paints. It’s all about experimenting, letting your imagination go and relying on our childhood art lessons about the color wheel. Say it with me folks, yellow and blue make green. Now I’m having Ziploc commercial flashbacks.
There are two methods of customizing polish:
- Layering – Using multiple layers of different colors to create the desired shade
- Mixing – Combining two or more lacquers in a bottle (aka Frankenpolish)
First let’s discuss the easiest way to customize your color, layering. It’s very no muss, no fuss. The only real trick is making sure the edges of each layer line up. If you have a shade that is too light or dark, layer it over white or black. Is your polish to sheer? Layer it over a similar hued opaque formula or black. Everything looks more intense over black. Love the shade of your chrome or metallic finish polish but hate the brush strokes? Add a sheer on top to achieve a smoother finish. Here are some examples from my own experiments.
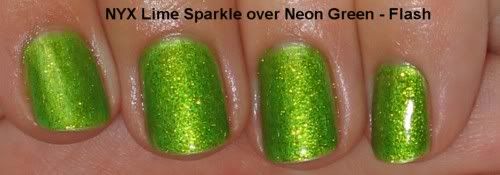
I was so excited when I got China Glaze Kaleidoscope Him Out and He’s Going In Circles because not only are they holographic but they’re blue and green holos. Unfortunately, I didn’t feel that the green and blue made enough of an impact.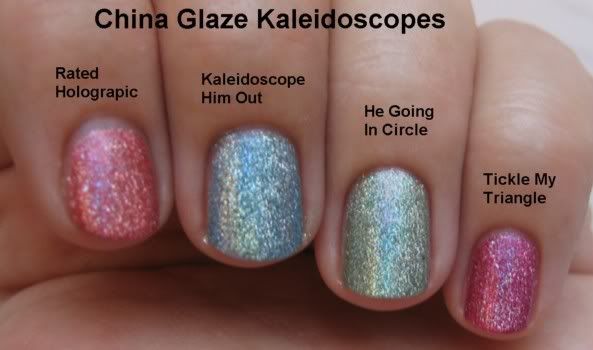
So I layered them over opaque creme lacquers and pow! Instant intensity.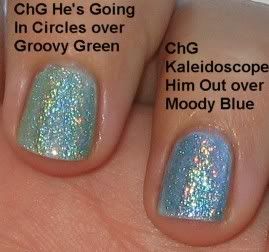
Here’s an example of how I combated brush strokes in a metallic finish. I love the color of China Glaze Open Sky but the finish left something to be desired. So I turned to a holo for help. Adding a layer of OPI Blue Moon Lagoon didn’t alter the beauty of Open Sky, it just added a little bling and a smoother look.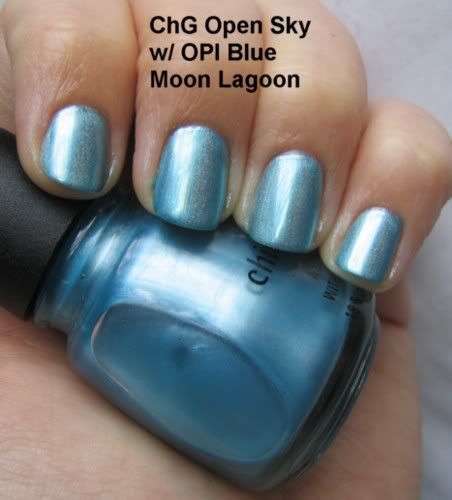
These two were just for fun. I love my greens but a girl can never have enough options.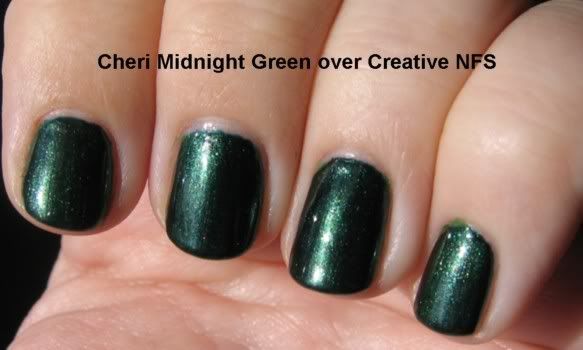
Now on to the science project that is the Frankenpolish.
My first try at making my own polish was to mix MAC pigment with clear lacquer. Mixing pigments can be a lot of work but if you have a gorgeous shade that would look great on your nails, it’s worth it. I buy Milani clear polish but others like using Sally Hansen Insta Dri. I add 1/4 tsp. of pigment at a time and mix, mix, mix before I test it on the nail. Just keep adding pigment until you’ve reached the desired opacity. If you can, add a couple mixing balls because the pigment will settle out when not in use.
Here are the results of my first ever pigment mix. This is MAC Entremauve in Milani Crystal Clear lacquer. The pink sparkles in Entremauve really pop as a polish.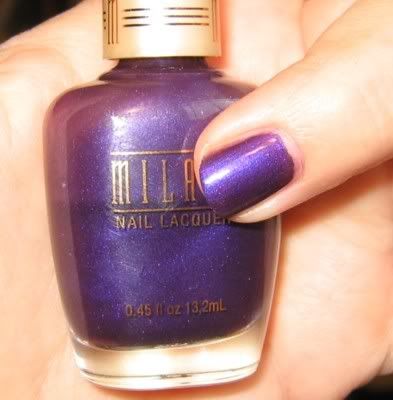
The other method for mixing your own polish is to combine different lacquers to create a new shade. The true Frankenpolish.
Disclaimer: Due to the volatile nature of nail lacquer ingredients I do not condone or promote mixing formulas from different manufacturers. There is no way to know if they will safely combine. So franken at your own risk.
For great tips on the supplies, process and recipes, check out the Frankenpolish Notepad on Makeup Alley. Bravo to Christine from 15 Minute Beauty Fanatic for creating it and to all the lovely MUA members that contribute to it.
These lovely frankens are the creation of MUA member jennyferr.
45% OPI Lincoln Park After Dark, 10% Black

Camouflage, 1/3 Zoya Tangy

Now it’s your turn. Share your favorite layering combos and recipes.
photos: All Lacquered Up and jennyferr on MUA
Zoya Holiday 2007 – Utopia
 Releasing in November for the holiday season, the Utopia collection from Zoya is a group of fun, bold shimmering metallic shades that will add a splash of color and glitz to those dreary gray winter days. And All Lacquered Up is fortunate to be the very first to see it, outside of the Art of Beauty family.
This is going to sound silly but whenever I hear the word Utopia I think of that Drew Barrymore movie Ever After. It’s a feminist take on the tale of Cinderella and in it the heroine (played by Drew) loves the book Utopia by Thomas More. I still have my copy of Ever After on VHS and even though I haven’t had a VHS player hooked up in years, I refuse to get rid of it. I love that movie.
Ok, so either someone at Zoya loves me or green nails is a trend that I didn’t see coming. Of all the jewels tones green is the color I least expected to become mainstream. Outside of our small online nail community I’ve never seen anyone else wearing it. But you certainly won’t hear me complaining. Bring on the greens!
My one and only complaint with this collection is the pigmentation. The majority of the lacquers needed three coats to become completely opaque and achieve the bottle shade. Similar to Suvi and Kotori from the Downtown Collection. I wonder if it’s because the extra pigment would thicken the formula and Zoya’s polish is already thicker than the typical non-Big 3 Free brands.
Austine is a muted brushed gold. On the nail it has the appearance hammered metal and the silver shimmer keeps the color from becoming too peach. Austina is more metallic than shimmery which sets it apart from the other shades in Utopia but thankfully it doesn’t affect application.
Tama is the least “me” shade of the bunch. I’m not anti-pink or brights but I feel there’s something in this shade that doesn’t work with my skin tone. It’s a pretty color and definitely more rosy in the sun but it’s just not something I would intentionally buy for myself.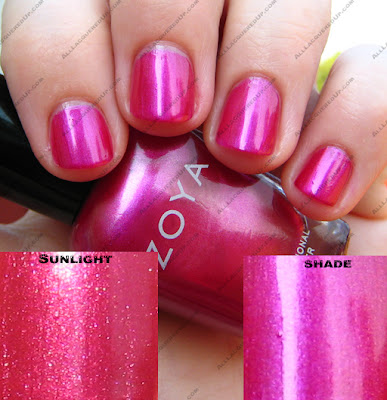
Kamilah is luscious crimson shade with a hint of gold shimmer that comes out in sunlight. As you can see in the individual swatch pics of this and some of the other shades, these polishes seem to have a slight duochrome effect. The color doesn’t completely change but it’s definitely more intense in direct light.
In the bottle Juno looks very much like a duochrome. The polish looks blue all along the edges of the bottle, similar to how Ki looks in the bottle. However on the nail, the blue isn’t that apparent which is a shame. A purple/blue duochrome would be amazing. Of all the purples I have, I feel that Juno will make my top 10 for sure, possibly even top 5. It has incredible depth, pigmentation and gloss. If you love purple, get Juno.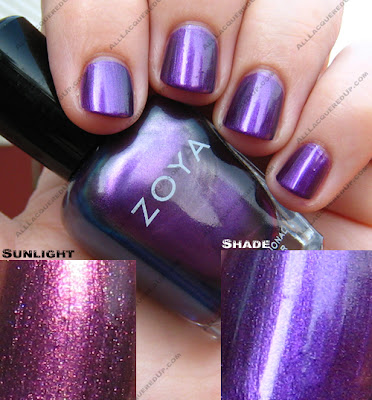
Akyra reminds me of a peacock feather. It’s not as bright but in the same vein. In the sun the green takes dominance and it’s the green that makes Akyra different than Kotori.
I saved the best for last. Irene is a stunning mossy sage green sprinkled with gold shimmer. This green is probably better suited to warm skin tones but a shade this gorgeous should not be limited by skin coloring. In case you haven’t guessed, this is my #1 pick from Utopia and a must have for anyone that loves or appreciates the beauty of green polish.
Which polishes will you be adding to your wish list?
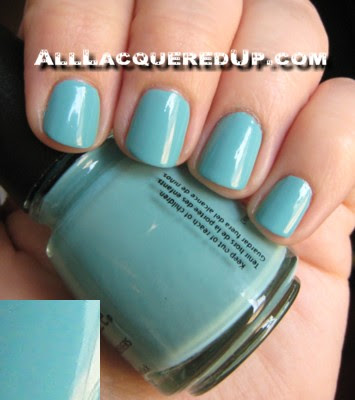
NOTD – China Glaze For Audrey
 I decided to wear China Glaze For Audrey during the photo shoot for the article coming out this Sunday. It’s very on trend and a brilliant tribute to Audrey Hepburn and Tiffany & Co. What girl doesn’t love Breakfast at Tiffany’s and Audrey Hepburn?
For Audrey is inspired by the famous Tiffany blue not a dead on dupe. I find the polish to be a bit more muted and dusty though definitely in the same vein.
 I picked up For Audrey from Head2Toe Beauty. 8ty8 Beauty carries it as well. If it is out of stock, don’t give up hope. Email both suppliers to see if there is more bottles on order before you give in to the eBay scalpers.
Top Coat Challenge – NYX Oasis
 In considering the best Big 3 Free base coat to use for the challenge, I excitedly ordered from the new NYX Oasis line. I couldn’t wait to try out Smoothie, their ridge filling base coat, along with NYX Oasis Gloss It Up and Wear n’ Tear top coats.
Unfortunately, my excitement died as soon as I started to apply them. I included my holy grail base coat, Creative Stickey, in the trial in combination with the two top coats.
I originally did a manicure using NYX Carol (not pictured) but my nails took forever to dry and I ended up with massive dents and ripples. The second day, I decided to give them a second chance with NYX South Sea.
I knew I was in for trouble when Smoothie immediately started bubbling on my nail. As much as I love NYX polishes and as gorgeous as South Sea is, it couldn’t make the bubbles disappear. I then alternated in applying the two top coats and waited for them to dry. I waited almost an hour and during that time, the bubbles you see below surfaced. I went to bed and woke up the next morning to find ripples from my sheets in addition to the bubbles. Which is what you see pictured below.
 So, even though I will continue to be a loyal user of NYX lacquer, I can not recommend Gloss It Up, Wear n’ Tear or Smoothie.
NOTD – Nocti Flying Naked
 Well, I’ve learned my lesson about trying to do a last minute mani. It’s a Don’t! I was trying to be quick like a bunny yesterday morning and I should have known better.
Cremes, brights and darks are not the kind of polishes you can just slap on and run out the door. Thank goodness this pic doesn’t show it but, I ended up with air bubbles from not waiting between coats, blue polish on my skin from rushing and overall blech-ness.
On the upside, I love the color. Nocti Flying Naked is bold and well pigmented. The shade flourishes even more under a shiny top coat and it flowed on my nail extremely well.
Now I know that the issue I had applying them to my nail art wheels was just because of the surface not the polish. Though I must point out that this is a two coat polish. The initial coat did go on a bit streaky and uneven. But the 2nd made it perfect. I’m always afraid of cremes because they magnify imperfections as compared to a shimmer/glitter polish but the nails that I didn’t eff up actually look really good and smooth.
So those of you that took the plunge and ordered Nocti sight unseen, I can honestly say you’ll be pleased.


