Red
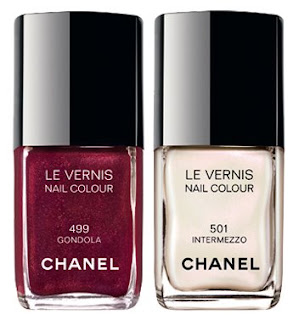
Chanel Intermezzo and Gondola Le Vernis for Fall 2009
 As a city built on water, Venice was a source of great intrigue for Gabrielle Chanel. She saw it as simultaneously dramatic and fragile – qualities she herself possessed. With the imagination of the CHANEL Makeup Studio, Venice comes to life in a palette reflective of the city’s shimmering facades and mosaics, and the sparkling aquatic colours of its lagoons.
As seen in the runway looks created by Peter Philips, Global Creative Director of CHANEL Makeup, at the 2009/10 Cruise Collection show, held on the beaches of Venice, Italy, rich sienna and deep rose tones, and dusky greys and greens combine for a modern look that can be softened for day or emboldened come evening.
Ahh Venice. How I long to go back. I spent three amazing days there with the Boyfriend back in 2002. We stayed in a gorgeous guest house, Palazzo Bembo, right on the canal near the Rialto Bridge. We spent our days wandering the maze of streets shopping, sightseeing and discovering the amazing food and wine of the region. This season Chanel aims to transport us to Venice with their fall colleciton inspired by the colors of this magical city. For nails they introduce Intermezzo, a white pearl, and Gondola, a stunning maroon shimmer. Let’s take a look.
Gondola is a rich burgundy sparkler. It is packed with gold and red micro-shimmer that catch the light adding a bit of jazz to what could be just another berry red. In typical Chanel fashion it’s a chic shimmer not a blingy glitter polish. It applied in two even coats and dried to a glossy, smooth finish.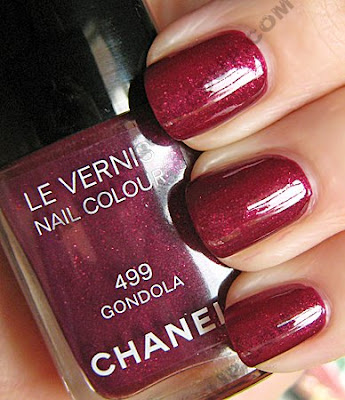
Intermezzo is an icy white with an opalescent shimmer that gives off a pinkish sheen in the light. I’m not gonna lie, I’m not really a fan of the formula. It applies pretty streaky, requiring three coats and even then my smile line shows through. The Chanel Fall collection Le Vernis lacquers retail for $23/ea and are available now on Chanel.com and at Chanel counters nationwide.
What do we think Fanatics? Are we loving these or what? Anyone planning to indulge?
“What’s On Your Nails?” with Carla from Product Girl
 What’s On Your Nails? is a series focusing on my fellow beauty bloggers and industry insiders, their favorite nail polish and other hot nail topics.Another week, another WOYN? and this week we’ve got Carla from Product Girl who is FINALLY sharing her NOTD with us (j/k Carla). Kids, this girl is a true “product girl” as her knowledge astounds me. Her love of makeup is deep and real and she can recall color names, collections, etc. like no one I’ve met. This girl has it down! What’s On Your Nails? is a series focusing on my fellow beauty bloggers and industry insiders, their favorite nail polish and other hot nail topics.Another week, another WOYN? and this week we’ve got Carla from Product Girl who is FINALLY sharing her NOTD with us (j/k Carla). Kids, this girl is a true “product girl” as her knowledge astounds me. Her love of makeup is deep and real and she can recall color names, collections, etc. like no one I’ve met. This girl has it down!
Since we chat regularly on IM I get to hear about her beauty hauls which makes me want to run to the mall and spend, spend, spend. That’s the last thing the boyfriend wants to hear. I can’t justify $45 for La Mer lip balm but hearing her rave about it is extremely enabling. For that reason alone I’m avoiding the La Mer counter. Read on to learn more about “Product Girl”, see her favorite red and learn which Sally Beauty find is her go-to top coat. |
My 4th of July Manicure – A Nail Art Extravaganza
So I started off very simple with a multi-colored manicure. It’s got patriotic spirit and is very user friendly. You don’t need nail art skills to make this happen yet it’s festive. Have a FANTABULOUS 4th everyone!
 Because Steph has been encouraging me to attempt polka dots, I finally took the plunge, adding some white ones using the dotting tool. Steph’s application tip: Pour a bit of polish onto aluminum foil to let it thicken. Dip the dotting tool in the polish and gently tap onto the nail, holding the tool perpendicular.
  Since I was so proud of my dots (this is truly my first effort), I added some to the red as well. Though I think that nail looks more like Toad from Super Mario Brothers than 4th of July.
 Now what would a 4th of July mani be without stars? So I broke out the nail art pen and drew a hasty star at the base of my nail. Application tip: Make sure your polish is completely dry or use a quick dry top coat, like I did, before you start to draw or else you’ll damage the color underneath.
 That star looked lonely so I gave it a friend. Note: The bonus of using these nail art pens is that you can wipe off any mistakes with water and not ruin the polish below. So don’t be afraid to experiment. Just be careful when you wipe to avoid skin contact because the color can stain.
  Finally, I added stripes to go with my stars. Because the special paint in the nail art pen dries matte, I applied top coat to protect the design and add shine.
 Now I realize this look is WAY over the top but we’re talking about a holiday where people paint stars & stripes on their faces so who really cares. If you want something a little more tame, try adding just one of these elements to your manicure for a little 4th of July pizazz.
