Nail Art
My 4th of July Manicure – A Nail Art Extravaganza
So I started off very simple with a multi-colored manicure. It’s got patriotic spirit and is very user friendly. You don’t need nail art skills to make this happen yet it’s festive. Have a FANTABULOUS 4th everyone!
 Because Steph has been encouraging me to attempt polka dots, I finally took the plunge, adding some white ones using the dotting tool. Steph’s application tip: Pour a bit of polish onto aluminum foil to let it thicken. Dip the dotting tool in the polish and gently tap onto the nail, holding the tool perpendicular.
  Since I was so proud of my dots (this is truly my first effort), I added some to the red as well. Though I think that nail looks more like Toad from Super Mario Brothers than 4th of July.
 Now what would a 4th of July mani be without stars? So I broke out the nail art pen and drew a hasty star at the base of my nail. Application tip: Make sure your polish is completely dry or use a quick dry top coat, like I did, before you start to draw or else you’ll damage the color underneath.
 That star looked lonely so I gave it a friend. Note: The bonus of using these nail art pens is that you can wipe off any mistakes with water and not ruin the polish below. So don’t be afraid to experiment. Just be careful when you wipe to avoid skin contact because the color can stain.
  Finally, I added stripes to go with my stars. Because the special paint in the nail art pen dries matte, I applied top coat to protect the design and add shine.
 Now I realize this look is WAY over the top but we’re talking about a holiday where people paint stars & stripes on their faces so who really cares. If you want something a little more tame, try adding just one of these elements to your manicure for a little 4th of July pizazz.
OPI You Don’t Know Jacques Matte & Glossy Nail Art
 After experimenting with the whole concept of mixing matte & glossy finishes to create nail art, I got the new OPI Matte polishes in to test and review. When OPI said MATTE, they weren’t kidding. This is my first experience with a true matte polish so I wasn’t sure what to expect. I’m currently testing the wear of the formula and a full review is coming, I promise! After experimenting with the whole concept of mixing matte & glossy finishes to create nail art, I got the new OPI Matte polishes in to test and review. When OPI said MATTE, they weren’t kidding. This is my first experience with a true matte polish so I wasn’t sure what to expect. I’m currently testing the wear of the formula and a full review is coming, I promise!
In the meantime I wanted to see how a modified french manicure would look using these different textures and I chose OPI You Don’t Know Jacques to play with. Check out my attempt, after the jump! |
First, let’s not play here. I’m no expert in nail art and my tip lines need some serious work. So ignoring that, let’s discuss what I did here. Using YDKJ, YDKJ Matte, CND Super Shiney top coat and Orly Nails for Males top coat I came up with four variations on the idea.
Index – OPI YDKJ base with OPI YDKJ Matte tip.
Middle – OPI YDKJ base topped with Orly Nails for Males with OPI YDKJ tip
Ring – OPI YDKJ Matte with OPI YDKJ tip.
Pinkie – OPI YDKJ with Orly Nails for Males tip.

 Obviously the two involving the OPI Matte polish are the most contrasting while the ones using the matte top coat are more subtle. You can also see that these new matte polishes are WAY different than just slapping a matte top coat on the old version of the color.
Honestly, I don’t know that I’m loving this look. It could be my shoddy workmanship but I prefer the stripes I did previously and, with Steph‘s encouragement, I’m trying dots next.
What do you think fanatics? Can you look past my uneven tip lines to see the possibility of a cool concept or are you just not feeling it as well? Sound off!
Get The Look – Fergie’s Striped Nails at the Wolverine Screening
 At last night’s screening of X-Men Origins: Wolverine, one of our fave nail trendsetters, Ms Fergie Ferg, rocked the red carpet sporting some flashy nail art. You all should know by now that I’m not really a nail art kind of girl but the occasional polka dot or stripe can be fun. At last night’s screening of X-Men Origins: Wolverine, one of our fave nail trendsetters, Ms Fergie Ferg, rocked the red carpet sporting some flashy nail art. You all should know by now that I’m not really a nail art kind of girl but the occasional polka dot or stripe can be fun.
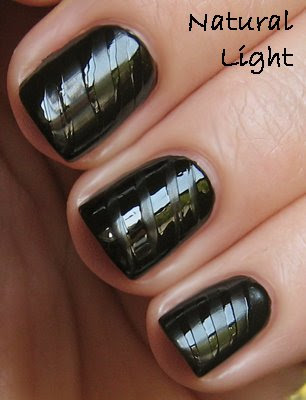
To accent her black and metallic dress, Fergie donned a silver and black striped nail that looks like a futuristic easter egg. She wore this same design for her birthday bash in Miami a few weeks back which is why I suspect that she’s actually wearing Minx, not polish. But fear not nail art lovers. You don’t have to plunk down a pile of cash to have a pro give you this look, you can recreate it at home on the cheap. I show you the tools and technique after the jump! Edited to add: Celebrity Manicurist Kimmie Kyees just confirmed that she did apply Minx on Fergie for the screening. |
Or if you prefer the straight lines, try Sally Hansen’s Nail Art Pens. The tip is like a small felt tipped pen and because the formula is water based, you can wipe off any mistakes without having to start over. So are we feeling this look? Would you try it at home? How do we feel about nail art? Share with the class.
 You can use any foil-like silver polish if you can’t find Shooting Star. Finger Paints Easel Come, Easel Go! is a great substitute. China Glaze INK with Nail Art Brush ($2.60-$2.99) can be purchased online from Head2ToeBeauty.com or TransDesign.com.
Get The Look – Fergie's Striped Nails at the Wolverine Screening
 At last night’s screening of X-Men Origins: Wolverine, one of our fave nail trendsetters, Ms Fergie Ferg, rocked the red carpet sporting some flashy nail art. You all should know by now that I’m not really a nail art kind of girl but the occasional polka dot or stripe can be fun. At last night’s screening of X-Men Origins: Wolverine, one of our fave nail trendsetters, Ms Fergie Ferg, rocked the red carpet sporting some flashy nail art. You all should know by now that I’m not really a nail art kind of girl but the occasional polka dot or stripe can be fun.
To accent her black and metallic dress, Fergie donned a silver and black striped nail that looks like a futuristic easter egg. She wore this same design for her birthday bash in Miami a few weeks back which is why I suspect that she’s actually wearing Minx, not polish. But fear not nail art lovers. You don’t have to plunk down a pile of cash to have a pro give you this look, you can recreate it at home on the cheap. I show you the tools and technique after the jump! Edited to add: Celebrity Manicurist Kimmie Kyees just confirmed that she did apply Minx on Fergie for the screening. |
Or if you prefer the straight lines, try Sally Hansen’s Nail Art Pens. The tip is like a small felt tipped pen and because the formula is water based, you can wipe off any mistakes without having to start over. So are we feeling this look? Would you try it at home? How do we feel about nail art? Share with the class.
 You can use any foil-like silver polish if you can’t find Shooting Star. Finger Paints Easel Come, Easel Go! is a great substitute. China Glaze INK with Nail Art Brush ($2.60-$2.99) can be purchased online from Head2ToeBeauty.com or TransDesign.com.


