Features
The Arsenal – Graham HandsDown Ultra Cosmetic Pads
 I get a lot of questions and comments regarding the tools and treatment products I use to keep my nails healthy and in tip top shape. Since my routine changes as I test new products, I’ve launched, The Arsenal, to share with you the items that are “must haves” in my nail kit.
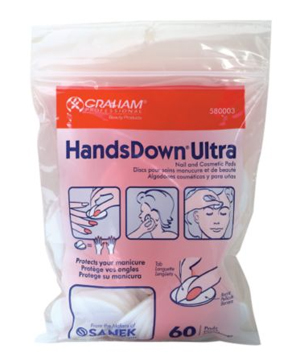
A cotton pad is a cotton pad, right? Not in my world. For years I went the cheapo route buying whatever bulk cotton pads or balls where the least expensive even though I continued to be frustrated by the little pieces of lint left behind, the polish stains on my fingers and how easily they disintegrated. Enter Graham HandsDown Ultra Nail and Cosmetic Pads. To my nails, they’re like the air I breathe, ESSENTIAL!
What’s so fab about them? For one, the plastic barrier and easy grip tab on the back of each pad. I can easily remove polish from just one nail without messing up the rest of my manicure. I can easily swatch polish without messing up a brand I’m testing on my non-swatching hand.
What else? Well they are lint-free which is a HUGE plus and they hold remover well so you use less product. With cotton pads, my fingers would end up wet which is bad for your skin and a waste. Thanks to the plastic backing, they are also very sturdy so you can remove polish from multiple nails without them falling apart.
Grahams HandsDown Ultra Pads can be purchased in a 60 ct package at Sally Beauty for $4.99 ($4.49 with Sally Card) or do what I do and order the big 240 ct bag from Head2ToeBeauty.com for $12.95.
Compared to drugstore brand cotton balls they are a bit pricey but considering you only need 1 or 2 per manicure, it’s worth the cost.
How many of you are HandsDown Ultra converts? Do you agree that they’re worth the extra coin? What’s your favorite nail polish remover pad?
Manicure Trick – Wrap Your Tips
 Much like wrapping the perfect present, a flawless, long lasting manicure requires a little wrapping of its own. Wrapping the free edge of your nail with polish helps extend the wear of your manicure and should become an essential step in your routine.
I’m sure most professional nail techs consider this part of their everyday manicure service but it’s not as well known in the consumer world. Since we discussed this technique in the comments of my Quirius review, and there were multiple requests for details, I figured a quick tutorial was in order. Read on to see my step-by-step guide to wrapping your tips and get a look at one of American Apparel’s latest nail polish releases. It’s GREEN! |
My First (and LAST) Water Marble Manicure
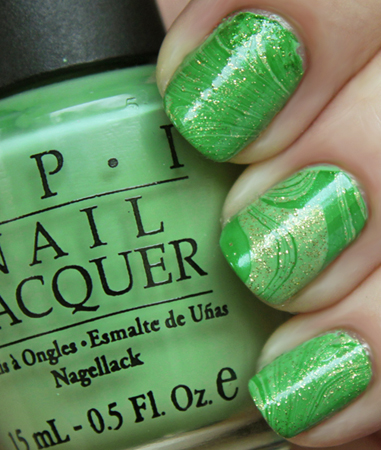 I should really call this manicure “An Afternoon of Frustration” because that’s how trying to create a water marble manicure left me feeling; FRUSTRATED! Those of you who have mastered the technique, I bow down to you. I honestly have no desire to try this ever again but since I made the effort, I thought I’d share my experience with you.
A few years back when China Glaze introduced the OMG! holographic collection, they posted a tutorial for their “Color Swirl” manicure and I was intrigued but intimidated by the process. Since then a whole mess of YouTubers have made countless water marble tutorials including lots of great tips and tricks to make the technique easier. I found myself watching a few this morning and got inspired. Find out more about the water marble technique and my adventure trying to recreate the look after the jump! |
Nail Tip – The Slimline Technique
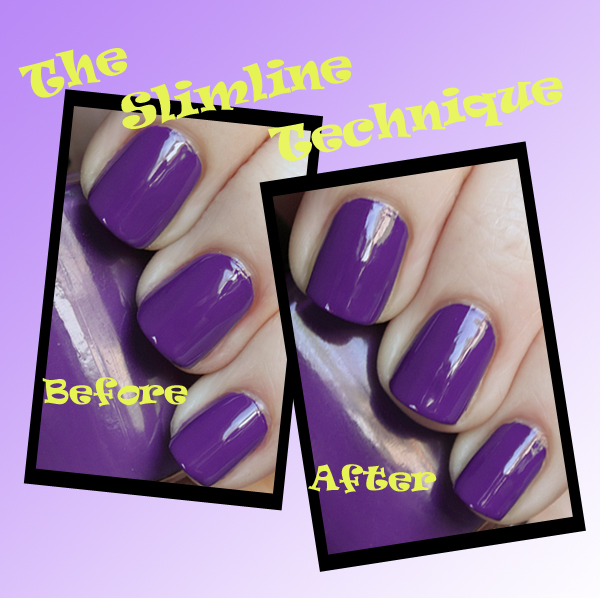 A few weeks ago, I unofficially polled you all about my nail length. Whether I should keep the slightly longer shape I showed in my Zoya Sparkle review or go back to my usual short tips. Ultimately I decided that a filing was in order for two reasons:
1. Being an accident prone klutz, I’m certain to break a nail as soon as it gets more than a few millimeters past my fingertip. 2. I just prefer the look of my nails when they are short. My ring fingernail tends to get a little wonky as it gets longer. The problem with keeping my nails “active length” is that I’m saddled with short, wide nail beds that look more stubby than chic. So what’s a girl to do when she doesn’t want the hassle of long nails but desires a slim, elongated look? That’s the exact I asked CND’s Roxanne Valinoti backstage during Fashion Week. Roxanne shared a great application tip she dubbed “The Slimline Technique.” It’s very simple and really does thin the shape of the nail. Check out my example above using OPI Funkey Dunkey and then find out more about it after the jump! |
Fanatic Feedback – Matching Nail Colors to Clothes?
 With Easter coming up this weekend, I started thinking about what I’ll wear to dinner with the folks on Sunday and, of course, what nail polish to choose. I was surfing the web as I was pondering when I happened upon the pic below of Emmy Rossum and Zach Braff at “The Darker Side of Green” Debate and I couldn’t help but notice Emmy’s scarlet dress and matching nails. It got me thinking about the whole matchy-matchy thing.
Typically, if I plan my outfit, I tend to wear polish colors to compliment, not match, though most days I’m running around with something that just plain clashes. I’ve noticed that a lot of celebs tend to go neutral or play the matching game and even in my area I see a lot of nude, French or matching nails. So am I alone in my ways?
What about you? When you plan out an ensemble do you tend to choose a nail color that matches or coordinates with your outfit? Or do you go the nude/sheer route?


